Showing posts with label Ireland. Show all posts

Monday, 3 July 2017

Viking shield

Viking shield revisited


Back in 2014 I made my first Viking shield using wood that came from an industrial pallet that I had left up in my attic for about 10 years. The shield looked really good however I was never quite happy with it and I ended up putting the shield back up in the same attic that I had stored the timber for so long.
So a few weeks ago, I decided I would take the shield down and redo it the way I wanted it to look. Maybe I could hang this on my wall and not be ashamed of it. Even though I say it myself, the workmanship was really good and the fact the wood was warped, cracked and split, really suited the shield perfectly. The worst thing for me however,  was the shield boss which I made from a Fray Bentos pie tin that fitted into a fabric covered ring I made from a piece of partial wood.  At the time, I had no access to metal plate that I could make a shield boss from. I also had very little money and no workshop. So I made the shield and the boss out of whatever materials I had at hand. In fairness, it was a really good way to recycle materials that would otherwise be thrown in the bin, even if it was the recycle bin at that. For anyone that does not know, the boss is the metal dome in the center of the shield that is used to protect the hand while holding the shield in battel.


As you can see in the photo above, the finished boss on the right looked ok if you had never seen a Viking shield before. But I was just not happy with it and felt it took away from finish, feel and look of the shield project. Now this shield was always just an art project, but could still be used in a re-enactment Viking battle.
So, when I was back home in Donegal, I found an old copper water cylinder and thought this would be ideal to finish off what was then my abandoned project. I cut the cylinder up into square sheets and flattened them out. I then made my new boss from a sheet of the bronze copper that I cut and hammered it out using a warrington ballpein hammer on a large log that I hollowed out to make a dish shape. I also used on old canon ball as an anvil to give it shape. The canon ball I dug up in a garden in Dublin Ireland, years ago.  Never really thought about it till now, but just wonder what the story behind the canon ball is?


When the boss was finished, I then got it professionally distressed and aged, so it would look the part. It turned out very good although I would have liked a little more Verdigris. Verdigris is the blue green oxide that aged bronze and copper has, as in the photo below.
So after a little bit of work, the new boss was ready to replace the fray Bentos pie dish.
So I went ahead and attached it to the shield, but it still didn’t look the way I wanted. Sorry, I did not take a photo
So I got out my rarely used carving chisels and started giving some texture to the wood. I then aged it and even got a blow torch to it and scorched some of the wood.


So this is the finished shield. I’m not 100% happy with it and I might age this in the future. I am also not happy with the edging as Viking shield would have used raw hide leather, but it does kind of looks the part.
It is what it is, so I am reasonably happy with the finished shield. 


Friday, 29 August 2014

Heavenly scented summer breeze


I decided to do a name change and edit to my new poem.
Still not 100% happy with it, but it is almost there.

Heavenly Scented Summer Breeze.  
An unfinished poem

By A.M.Donaghey 


Heavenly scented summer breeze, grassy carpet of outdoor leisure.
On drowsy days of lemonade, and effervescent pleasure

Dandelions and camomile, stipple through a vale of green.
Grass with seed and flower heads, all weighting for a preen.

Taste of sweetness summer fruits, that tantalize the tongue.
and coolness ice cubes in your mouth, that almost quench the sun.

Shadows of the summer leaves, swirl and flicker through the air.
moments, minutes and hours pass by, and all with out a care

Singing birds and buzzing bees, insects on the wing.
Dream like in this warmth of light, and memories that they bring.
 
How id love to be there now, the childhood times I  treasure.
 On those drowsy days of lemonade , that summer breeze of pleasure.


 As always, thank you for reading my blog and please comment if you wish.

Friday, 22 August 2014

New Poem, Sitting on the lawn.


Sitting on the lawn.

 An unfinished poem   By A.M.Donaghey 

Heavenly scented summer breeze, grassy carpet of outdoor leisure
On drowsy days of lemonade, and effervescent pleasure
Dandelions and camomile, stipple through a vale of green
Grass with seed and flower heads, all weighting for a preen
Taste of sweetness, summer fruits, that tantalize the tongue
and coolness ice cubes in your mouth, that almost quench the sun
Shadows of the summer leaves that swirl an flicker through the air
moments, minutes and hours pass by, and all with out a care
Singing birds and buzzing bees, insects on the wing
Dream like in this warmth of light, and memories that they bring
How id love to be there now, feel that summer breeze of pleasure
On those drowsy days of lemonade , the childhood times I treasure 

As it is coming into September and we are seeing the last few days of our Irish summer, I thought I would try and finish a poem that I started writing last year. As always, I am not 100% sure if it is fully finished and I may re write it in the future.

As always, thank you for reading my blog and please feel free to comment if you wish,

Wednesday, 30 July 2014

Second Viking shield FINISHED


Second Viking shield FINISHED

I am glad to say that I have finished my second Viking shield and it turned out quite good. Typical of me, that I am not 100% happy with it, but then again I never am happy with my work. But that's me in a nut shell I suppose.


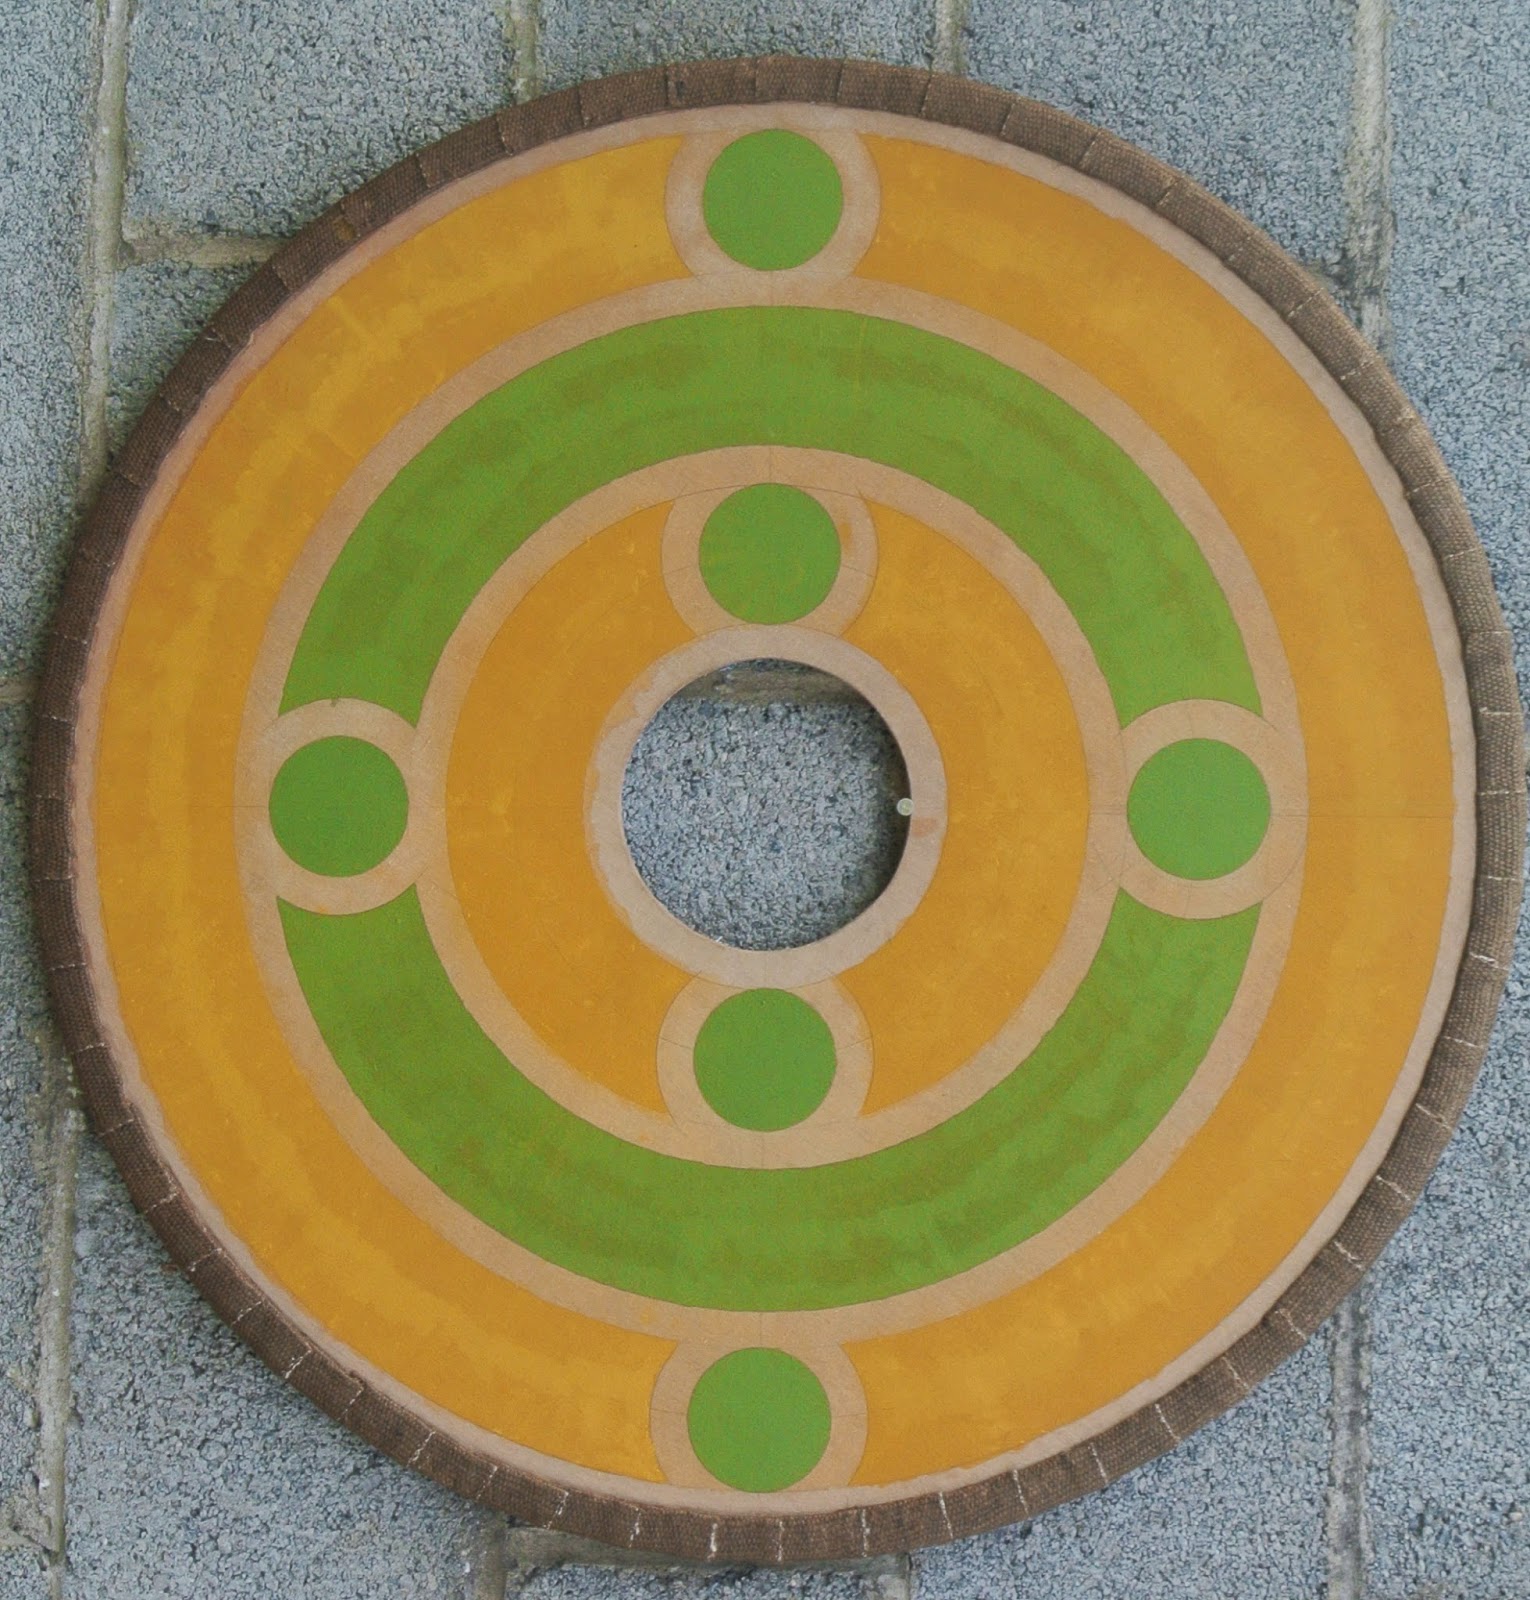
So this is the finished Viking shield, that has been aged and ready to be hung on the wall.

It took me ages to paint the design and when it was almost finished I realised it looked more Roman than Viking. I then looked at a few books on my bookshelf and decided that a few Celtic designs from the Book of Kells would look good in the medallions and I am hoping that it looks more Viking now.


I used natural earth colours like burnt umber and yellow ochre as these colours would have been available a thousand years ago. The green colour was made up with yellow ochre and some copper oxide. Once I was reasonably happy with the painting, I then aged it and put a few coats of wax over it all. There is a slight brown colour to the wax which gives it a rough antique finish which is what I was looking for.


I then pined and nailed the boss on to the shield before putting the handle on the back. I decided to pad the boss with some of the jute webbing as I feel this gives it the look and feel of a real usable Viking shield. This shield was however made and designed as an art piece, but I am confident enough that it would work well as a re-enactment Viking shield, although I am sure it would get destroyed in battle.


Over all, I am happy with this project and am fighting the urge to build another few shields. I think my next project will be to finish a self portrait piece that I made when I was in college a few years ago. The portrait is called Evidence and although I got a distinction for it, I never got round to putting a few final finishing touches to the piece.


So until next time, thank you for reading my blog and please comment if you wish.

Sunday, 20 July 2014

Second Viking shield part 1


Second Viking shield part 1


After finishing my first Viking shield art project, I decided to make another one as I had found more timber up in my loft. So I started building it, but then realised I just did not have enough wood. As you may remember, this timber was used for the blind carving and my Viking shield. It came from a large industrial pallet that I took apart and put up in my loft over ten years ago.  The timber was warped, cracked and really rough, but I always knew I would use it for something other than cutting it up for firewood. 


Anyway, as I was saying, after starting to second shield, I now find I just do not have enough wood and also some it is just not usable. So I went down to the nearest DIY store and bought the cheapest cladding wood I could find and now have enough to also make a third shield as well.  As this new shield will be covered in canvas or linen and painted, as some original Viking shields would have been made, I went down to the local curtain shop and bought some large curtain liner cloth as this will do the job at a fraction of the cost, as linen and canvas is expensive. When the Vikings made this kind of cloth covered shield, they would then paint it with Viking / Celtic designs. This is what I intend to do once this shield is complete.
 
 So here are some of the construction processes that go into making my shield.


I did the edging the same way the Vikings would have done it, but used jute webbing instead of raw hide, as I just can not afford to buy raw hide. I feel the jute webbing looks every bit as good and as it is a sculptural art project and not going to be used for battle, I feel the jute works and looks authentic.

I have to say that putting the edging on the shield took me about 5 or 6 hours as it is made up from individual over lapping pieces that are nailed and sown on. After a few hours of working, I gradually found my rhythm when it was half way finished. Then it only took about an hour to complete the rest. 

I recon if I make this again, I will complete the edging in 1 ½ hours instead of 5 or 6.


So this photo shows the comparison between pre and post ageing. Also as you can see, I have temperately put a boss in the center of the edged shield, to give an indication what the finished piece will look like.    By the way, the two photographs were taken at different times of day and also by different cameras. 


Now all I have to do is research and create a Viking / Celtic design that I will then paint on, using natural earth colours like burnt sienna, red and orange ochre and colours that would have been available a thousand years ago.


So once again, thank you for reading my blog and I will show the completed shield in my next post.

Tuesday, 20 May 2014

Blind Carving part 4. New sculptural wood carving from a wooden pallet. Finished


Blind Carving part 4.   Finished 

New sculptural wood carving made from a wooden pallet 


Finished with clear wax


 Brown wax makes it look less grey and warmer


The finished blind carving, hung on my kitchen wall.

This is the finished blind carving that I made from an old wooden pallet.
As you can see it turned out OK considering how bad the wood was. All the sections married up and they match well, which was a surprise as each piece was carved blind from each other.
You can also see how the wood reacted with the iron oxide vinegar mix and also how the brown wax made it look warmer.

Now its time to plan another project, so if anyone has any suggestions, please feel free to leave in the comments.


Blind Carving part 3. New sculptural wood carving from a wooden pallet


Blind Carving part 3.  

New sculptural wood carving from a wooden pallet


I am glad to say that I got the blind carving project finished, and considering the materials and tools I used, I am very happy with it. Before I go any further into describing how I finished the project, I would like to show you some of the carving tools I used and also ones that I just could not find at the time.


I went up into the loft today and found some of my carving chisels, the ones I didn’t use on this piece. I do have a few more, but sill need to locate them.
These are two Ashley Iles chisels that I bought when I was still an apprentice in 1989. They cost me, I think, about £18-£22 each, which works out at €22.86-€27.94 in Euros. When I bought them, they were reasonably priced at the time and I also got a trade discount from the tool shop I bought them in. They are fantastic chisels and came already sharpened, honed and ready to use. They also keep sharp when in use.


Now in comparison, this is a full set of 12 carving chisels that I bought in Lidl in 2012. They cost me €16 for the whole set which is an average on €1.34 each as compared to between €22.86-€27.94 for just one chisel. In many ways it seems a no brainer that the Lidl woodcarving chisels I bought a few years ago are good value, which indeed they are. But I have already spent about 7 or 8 hours, grinding, sharpening and honing them, and even with all that time I still haven’t been able to get them even a fraction as sharp as the Ashley Ilse chisels. When I can get them sharp, they just don’t hold a keen edge as the tool steal is too soft. In saying that, they are an OK starter set for anyone that is willing to put the work into grinding, sharpening and honing.


So back to the blind carving project.

I was able to get the nine sections of the coin finished and as I did each piece, I stained them with the iron oxide, vinegar mix. 


I then put a coat of wax on as each piece dried and am glad to say it looks OK.
As all the sections are separate pieces, I had to join them up together. I used MDF flooring to make a back and used hot melt glue to stick the carving on it. Although it made the carving sturdy, it also made it very heavy and I think the weight would have been too much to hang it on a normal domestic wall. I decided to take the MDF off and use an old curtain liner as a backing. So I cut the curtain liner into strips and then glued and stapled it to the back of the carving. Once this had dried, I then glued the rest of the liner over the whole back, which covered the staples and made it all look neater. I then put some picture hanging wire on the back and it was almost finished and ready to hang on the wall.
I felt that the carving looked a bit grey, so I put some brown wax on and buffed it off when it dried. To be honest, I now feel that it may have looked better before the brown wax went on, although the brown does make the finished piece look warmer.


So this is the finished piece that was made out of a wooden pallet.
I know it is not perfect, but I do think the imperfections add to overall look. As you can see, not all the pieces match up and some of the wood has started to warp and crack. I have to say I am very happy with it and for the first time since 1997, I feel like doing wood carving again. The reason I say 1997 is because that is when I made my first and up until now, my last carving. Now that's another story that I will talk about some day, and the reason my good carving chisels were in my loft.


Thank you for reading my blog and please feel free to make a comment if you wish.